Troubleshooting Sewing Machines
- My sewing machine is skipping stitches
- Is the needle an Elna needle, a different brand can cause stitching issues
- The needle maybe bent or blunt replace with a new Elna needle
- The needle thread is not threaded correctly, rethread
- Are you using the right Elna needle for the fabric being sewn
- The needle is breaking
- Check the needle is inserted correctly and is pushed up into the needle clamp
- The needle clamp screw maybe loose, tighten with a screwdriver (not too tight)
- Are you using the correct needle for the fabric being sewn
- When you start to sew, the threads should be drawn back under the sewing foot
- Are you using the recommended foot for the stitch being sewn
- The needle thread is breaking
- Re-thread the machine
- The needle may require replacing, replace with an Elna needle
- Check the needle is inserted correctly and is pushed up into the needle clamp
- The thread may be too heavy or too fine for the needle
- When you start to sew, the threads should be drawn back under the sewing foot
- The bobbin thread is breaking
- Re-thread the bobbin ensuring the thread is in the bobbin holder tension spring
- Clean any lint build up in the bobbin area

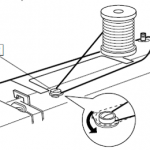
- Is the thread wound loosely on the bobbin, does the wound thread feel spongy, if so re-wind from the spongy bobbin onto another Elna bobbin making sure you pull the thread into the thread guide (#2 in picture)
- Check that the bobbin is not damaged, are you using an Elna bobbin
- The machine is noisy and not running smoothly
- Check the bobbin area does it need cleaning, is there a lint built up
- Thread may be caught in the bobbin area, check area
- Stitches are looping on the underside of my sewing
- Re-thread the top thread, looping is usually caused when the thread is not sitting correctly within the top tension unit. During re-threading hold the thread at the top of the machine and thread with the other hand, the thread should be pulled firm, not loose, allowing the thread to slot into the disc’s within the tension unit.
- The machine does not work
- The machine has an on/off switch on the right hand end, it maybe in the Off position
- Check the bobbin area is there any thread caught or a build up of lint
- Is the bobbin winder spindle in the left position. If across to the right return to the left
- The fabric is not feeding
- Check the feed dogs are in the raised position, they may have been dropped for a previous sewing application
- Is the stitch length correct for the fabric type
- Clean the feed dogs with a soft brush, there maybe some lint build-up
- My seams are puckering
- Check that the stitch length is correct for the fabric being sewn
- Check the machine threading
- Are you using the correct Elna needle for the application
- My computerised machine has a error message on the screen
- Check your instruction book for answers to different messages
- If the customer can not correct the machine after following the machines instruction book, please call Elna Australia for further assistance
Troubleshooting Overlockers
- The overlocker does not work
- There is an on/off switch on the right hand end, it maybe in the Off position
- If the sewing light is on and you can hear the motor engaging when you put your foot on the control, open the open covers & check that there is nothing jammed in the needle area/ looper area
- The fabric is not being cut neatly
- Check there is no lint build-up around the upper knife, de-activate the upper knife moving it out of position to clean around it, then re-activate
- The knife will become dull over a period, faster if you are sewing heavy fabrics. You will need to have the knife replaced
- The knife can also have cutting issues if you run over pins. Pins can cause nicks in the knifes cutting surface which results in cutting issues & reducing the life of a knife
- My seams are puckering
- Check that the stitch length is correct for the fabric being sewn
- You may need to adjust the differential feed dial. Stop puckering turn dial towards 0.5
- Check the threading
- Check the threads are not catching as you sew on the underside of the thread cone
- A thread broke, I re-threaded it and now the overlocker will not chain
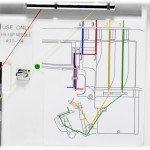
- Elna overlockers need to be threaded from right to left, the threading order is lower looper, upper looper, right needle, left needle
- See image of threading chart

- Green – Lower Looper
- Yellow – Upper Looper
- Red – Right Needle
- Blue – Left Needle
- If looper thread breaks, re-thread then cut needle threads before the eye of the needle & re-thread
- If needle thread breaks, cut needle threads before the eye of the needle & re-thread both needles
- Use only Elna ballpoint needles, other brands of needles can cause stitching issues & thread breakage
- The overlocker is skipping stitches
- The needles may need replacing as they are blunt. Use only Elna ballpoint needles
- Check the needles being used are Elna ballpoint needles
- Is the threading correct
- Make sure the threads are not catching as you sew, on the underside of the thread cone
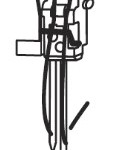
- Are the Elna Ballpoint needles inserted correctly

Note: The 2 needles sit offset when inserted correctly
Left needle sits higher than the right needle
- The stitches are hanging off the edge of the fabric
- Gradually, increase the 2 looper tensions (higher number) until the stitches are sitting on the edge of the fabric
- Check the lower blade position & adjust accordingly
- Is there a stitch width adjustment
- Yes, by adjusting the position of the lower blade. If you are requiring a narrow seam to need to also adjust the looper tensions accordingly, to sit neatly on fabric edge
- The stitching in my seam is loose and looks laddered
- This is usually tension. Check that the threads are sitting firmly in the tension units, pull on the threads to ensure they are engaged into the tension disc’s. You may hear the thread click into the tension disc’s which means the thread had no tension causing a stitch issue
- Why use Differential Feed
- Differential feed changes the speed of feed dogs when feeding the fabric under the overlocker sewing foot
To eliminate stretch – turn the differential feed dial towards 0.5
To gather or sew on a curve (Eg: top of the sleeve) turn the differential dial towards 2.25
